Materials Needed: four colors of felt fabric, scissors, pins, paper, plain shirt (target or old navy), hot glue or fabric glue (optional: sewing machine), ribbon (use if you plan to make an owl cape)
1.Cut a 3"x3" square out of paper then cut two of the sides down so it comes to a point and one side has a straight edge. This will be your pattern for making the owl feathers.
2. Take your paper feather pattern and cut out about 40 feathers per each color (this is if you plan to make a cape and a shirt). Adjust the amount if you need more or less.
3. To make a cape--measure your child's chest. Using a pencil free-hand a cape pattern on one of your felt fabric--the smallest width would be the chest size and then flair out so it make a cape.
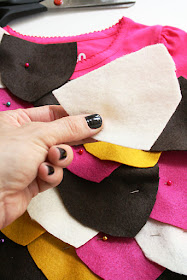
4. Take your felt feathers and starting at the bottom and working you way up to the top of the shirt/or cape, create rows of alternating felt colors.
5. Pin down. Then glue for a quick finish (or sew). Take pins out once all the feathers are intact.
6. The owl hat was a little more tricky. I free-handed another hat pattern out of paper with flaps then used the pattern to cut the felt out--one for the front and one for the back. Then sewed them right sides together (or you can glue but you have to wait to dry before turning it right sides out). Then turn the hat so the right sides are now out and the seam is now inside the hat. Cut additional felt to make the eyes and beak.
7. To make the owl ears, take one of the owl feathers and put the corners together from the straight edge. Secure and intact behind the owl eyes.
8. If you plan to do a cape, you can kind of see how I cut the shape out of the felt. Once you completed your rows, you then secure ribbon on the edges to be able to tie on the child.
Have a Happy Owlween!


What a cute costume! And it doesn't hurt that the costume model is adorable...
ReplyDelete